
Introduction
Remote and hybrid work aren’t going anywhere, yet most “home office inspiration” you’ll find online looks like it was styled for a magazine shoot—custom built-ins, $1,200 standing desks, designer chairs. That’s not helpful when you’re working from a bedroom corner with $200 and a landlord who won’t let you hang a shelf. This guide is different. These are DIY home office ideas on a budget that real people can actually pull off, whether you have a spare room to transform or just a sliver of wall behind the sofa. Instead of aspirational-only spaces, you’ll see practical setups that match what design sites like Real Homes highlight as realistic, budget-conscious upgrades.
Over the next few sections, you’ll find a planning framework to figure out what you actually need before you spend a dime, concrete DIY desk and storage builds with approximate costs, room-by-room layouts for bedrooms, living rooms, closets, spare rooms, and even garages, plus practical advice on lighting, ergonomics, cable management, and tech setup—all without blowing through your budget. At the end, you’ll get three tiered shopping lists ($100, $300, and $500) so you can pick the plan that fits your wallet and get started this weekend.
Before You Start – Plan Your Budget Home Office
Jumping straight into buying furniture is the fastest way to waste money on things that don’t fit your space or your work. Spending 20 minutes on a simple plan will save you far more than 20 minutes of returns and regret. Think of this section as your decision map—answer four quick questions, and you’ll know exactly where to focus your budget.
Assess Your Space
Start by figuring out which type of space you’re working with, because each one comes with different constraints and opportunities.
- Spare room: You have the most flexibility here—a dedicated door you can close is a luxury. Your main challenge is furnishing a full room without overspending.
- Bedroom corner: You need to share the room for sleep, so visual separation and keeping work energy contained matter more than anything else.
- Living room nook: The office has to look presentable at all times since it’s in a shared, visible area. Slim furniture and tidy cable management are non-negotiable.
- Closet or “cloffice”: Surprisingly effective for small apartments. The main constraints are depth (most closets are only 24 inches deep) and airflow.
- Garage or basement: You’ll have space, but lighting, temperature control, and flooring are the hurdles you’ll need to solve first.
If you’re working with a very compact apartment, you’ll find even more layout strategies in our guide to small apartment decor ideas for women.
Define Your Work Style
Your daily tasks should drive your setup choices. If you do deep-focus work like writing or coding, a quiet corner with minimal distractions and a large enough desk surface for a monitor and notebook is the priority. If your day is meeting-heavy with lots of video calls, you need to think about your background, lighting on your face, and camera angle before anything else. And if you do creative work—design, content creation, crafting—you’ll want the largest desk surface you can manage plus accessible storage for tools and supplies. Knowing your work style keeps you from spending money on things that look nice but don’t actually help you get through your day.
Set Your Budget Tier
This guide uses three budget tiers as a framework, and you’ll see full sample shopping lists for each near the end of the article. The $100 refresh assumes you’re mostly working with furniture you already have and just need to make things more functional and comfortable. The $300 functional setup covers a decent desk, basic ergonomic improvements, storage, and some decor. The $500 transformation gets you a more complete, comfortable, and polished workspace from scratch. Pick the tier closest to your situation and use it as a starting point—you can always mix and match.
Renter vs. Owner
This is a simple but critical distinction. If you’re renting, lean toward removable solutions throughout this guide: command strips, tension rods, freestanding shelving, peel-and-stick wallpaper, and furniture that doesn’t need to be anchored to a wall. If you own your home, you have more options—painting an accent wall, installing floating shelves with proper anchors, or building a permanent Murphy desk. Every idea in this article will note whether it’s renter-friendly, so you’ll always know before you pick up a drill (or put it down).
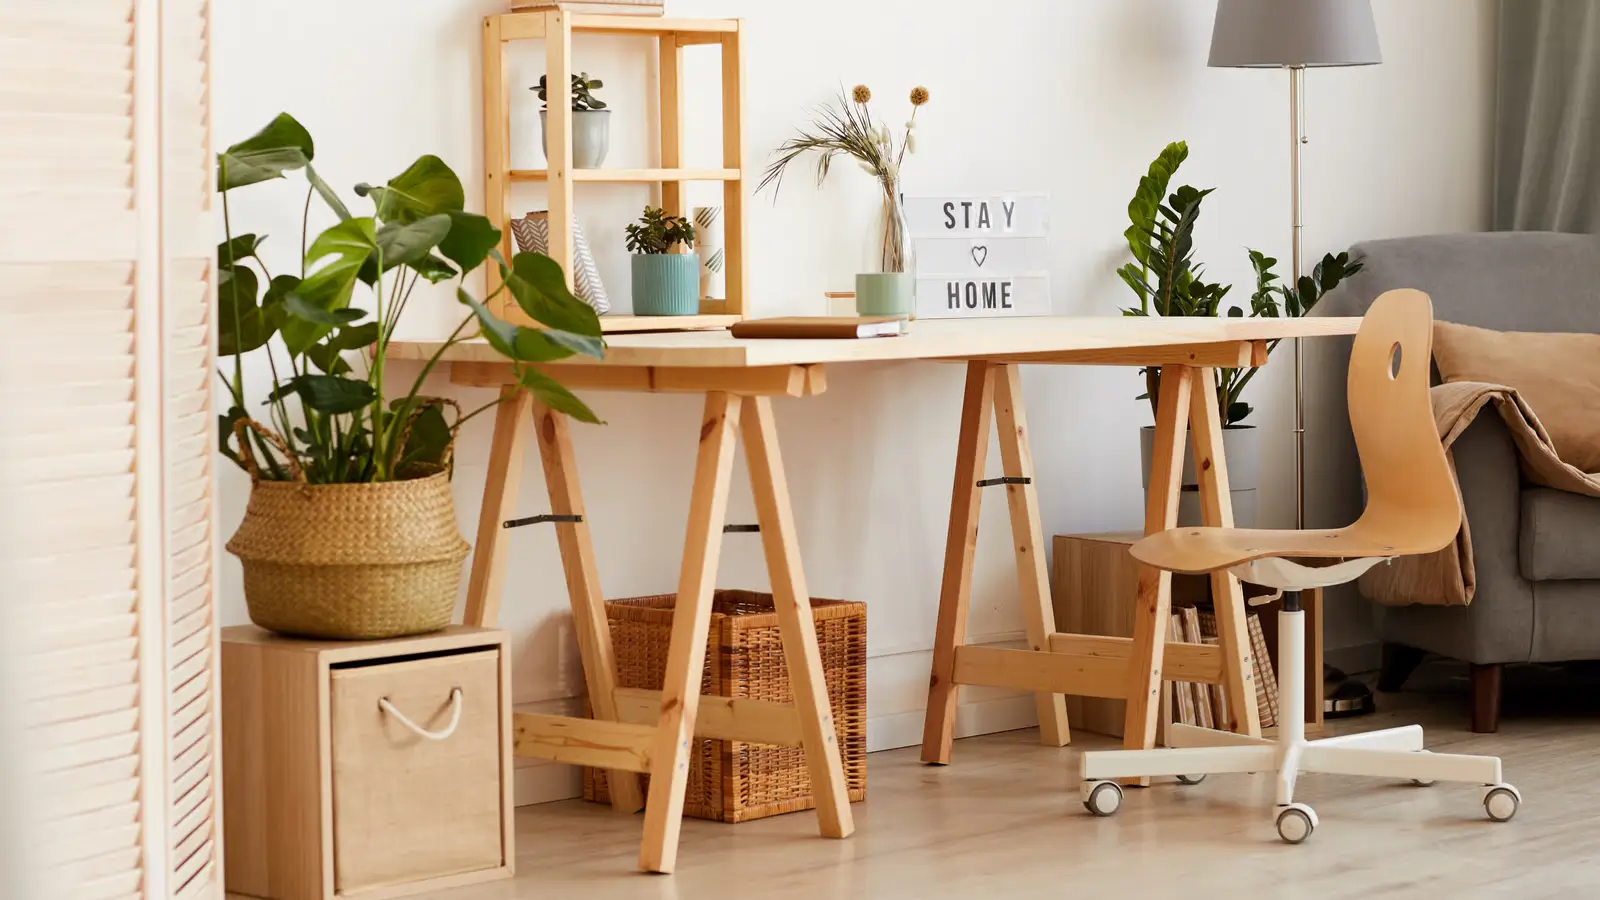
DIY Desk Ideas on a Budget
The desk is the centerpiece of any home office, and it’s also where people tend to overspend. A perfectly functional, good-looking desk can cost you anywhere from $0 (if you repurpose what you have) to around $200 if you build or hack one from scratch. Many of the most effective DIY home office ideas on a budget start with the desk, because once you solve your work surface, everything else becomes easier. Here are the best options, ranked roughly from cheapest to most involved.
IKEA countertop + drawer unit hack: This is one of the most popular budget home office ideas for a reason. Buy a KARLBY or EKBACKEN countertop (around $70–$130, depending on size) and set it on top of one or two ALEX drawer units ($80–$100 each). You get a huge, solid work surface with built-in storage for roughly $150–$230 total. No tools required—the countertop just sits on the drawers. Completely renter-friendly.
File cabinet + board desk: Find one or two secondhand metal file cabinets at a thrift store or Facebook Marketplace ($10–$30 each), then lay a pre-cut wood board, a solid-core door, or even a butcher-block shelf across the top. Total cost: $30–$80. You can spray-paint the file cabinets to match your decor for an extra $10 in paint. The cabinets double as storage, and you can take the whole thing apart when you move.

Floating wall-mounted desk: If floor space is tight, a wall-mounted desk keeps the area below clear. You can buy a simple fold-down wall desk for $50–$100, or build your own with a solid wood board and two heavy-duty shelf brackets ($20–$40 total). This does require drilling into the wall, so it’s better for homeowners or renters who can patch a few holes when they leave. It’s an especially great fit for studio apartment decor ideas for women, where every square foot counts.
Repurposed door on trestle legs: An old solid-core door (check salvage shops or Habitat for Humanity ReStores, often $10–$30) makes a massive, sturdy desk surface. Pair it with two sets of trestle legs from IKEA ($15–$25 per pair) or even two sawhorses from a hardware store. Sand and seal or paint the door, and you have a workspace with character for under $70.
Fold-down Murphy desk: For very small spaces where the desk needs to disappear after work hours, a Murphy-style fold-down desk is ideal. Kits are available online for $80–$150, or you can follow a tutorial to build one with a piano hinge, a piece of plywood, and a wall cleat. This is one of the best small home office ideas on a budget for people who share a room with another function.
Thrifting tips: When shopping secondhand for desks, look for solid wood pieces with good bones—scratches and outdated finishes are easy to fix with sandpaper and paint. Avoid anything with particle board that’s already swelling or peeling, desks with wobbly joints that can’t be tightened, and anything that smells like mildew. Check Facebook Marketplace, Craigslist, estate sales, and Habitat ReStores. Early mornings on weekends are the best time to find deals.
Affordable Storage & Organisation
A cluttered desk destroys focus faster than almost anything. The good news is that storage is one of the easiest things to do cheaply—you just have to think vertically and creatively.
Go Vertical
Your walls are free real estate. Floating shelves ($10–$20 each from IKEA or Target) installed above your desk give you book, supply, and decor storage without taking up any desk or floor space. If you can’t drill, a tall, narrow bookcase like the IKEA BILLY ($50–$70) leaned or secured against the wall works just as well. Wall-mounted grids and pegboards ($15–$30) are perfect for hanging headphones, scissors, tape, and frequently used tools—and they look great if you arrange them intentionally. Use your vertical space in corners, especially where a slim shelving tower can tuck in without blocking walkways.
DIY & Budget Storage
Old metal file cabinets from thrift stores can look surprisingly stylish with a coat of spray paint in matte black, white, or a bold accent color—budget about $15 total for the cabinet plus paint. Contact paper (around $8–$12 per roll) can transform the look of plain wooden shelves, drawer fronts, or even the side of a desk. Cube organizers like the IKEA KALLAX or Target’s Brightroom line ($30–$60) paired with fabric baskets ($5–$8 each) give you modular, renter-friendly storage you can reconfigure or take with you when you move. For desk drawers, use small boxes, jar lids, or even cut-down cereal boxes as dividers instead of buying expensive organizer inserts.
Cable Management
This is one of the most overlooked parts of a budget home office setup, and tackling it costs almost nothing. Start with adhesive cable clips ($5–$8 for a pack) to route charging cables and lamp cords neatly along the back edge or underside of your desk. A cable sleeve ($7–$10) bundles multiple cords into a single fabric tube that runs from your desk to the outlet—this alone makes a dramatic visual difference. For a power strip, mount it to the underside of your desk with heavy-duty velcro strips ($5) to get it off the floor. You can also make a simple DIY cable box by cutting slots in the ends of a shoebox and routing all your chargers through it, hiding the tangle inside. Spend $15–$20 on cable management once, and your office will look twice as expensive as it is.

DIY Home Office Ideas by Room Type
Where you put your office matters as much as what you put in it. Here’s how to make each type of space work, with specific solutions that match each room’s quirks.
Bedroom Corner Office
The biggest challenge with a bedroom office is mental separation—you don’t want to stare at your to-do list while trying to fall asleep. “Zone” the corner by placing a small area rug (a 3×5 rug for $20–$40) under your desk and chair to visually define the workspace as its own territory. A slim desk no wider than 40 inches won’t overwhelm the room. Add a floor lamp or desk lamp that’s only on during work hours to reinforce the boundary with light. For stronger visual separation, hang a curtain from a tension rod ($10–$15) or position a small bookshelf perpendicular to the wall as a room divider. When work is done, close the laptop, turn off the lamp, and step off the rug—that ritual matters. For more ideas on making this space feel intentional, see our cozy home office ideas guide.

Living Room Nook
A living room office needs to blend in when it’s not in use. The best spots are behind a sofa (a narrow console desk works perfectly here), along a window wall, or in an unused alcove. Keep the desk slim—30 inches deep or less—and choose furniture that matches the living room’s style so it reads as a design choice, not an afterthought. Use the back of the sofa, a tall bookcase, or a cluster of tall plants as a natural divider between the living area and the workspace. Wall-mounted desks or fold-down desks are particularly good here because they can practically vanish when you’re done for the day. Keep desktop clutter to an absolute minimum since this space is always visible, and invest the extra five minutes in daily tidying. Check out space-saving furniture ideas for more dual-purpose pieces that work well in shared rooms.
Closet Office (Cloffice)
Converting a closet into a home office is one of the smartest, cheap home office ideas for small apartments. A standard reach-in closet (roughly 24 inches deep and 4–6 feet wide) gives you just enough space for a desk surface, shelves above, and the ability to close it off when the workday ends. Start by removing the closet doors or replacing them with a curtain on a tension rod (completely renter-friendly). Install a shelf or cut a piece of wood to fit as a desk surface at elbow height—the closet’s side walls support it, so you may not even need brackets. Add one or two shelves above for storage. Since closets don’t have outlets, run a slim extension cord along the baseboard and add a plug-in puck light or LED strip ($10–$15) under the top shelf for task lighting. Use removable adhesive hooks for headphones or cable loops. The whole conversion can cost under $50 if you use materials you already have.

Spare Room Office
If you have a whole room to work with, the temptation is to fill it—resist that. A spare room office lets you spread out, but you should still spend strategically. Put most of your budget into the two things that affect your body all day: a good chair and good lighting. Save on everything else by using DIY shelves, thrifted furniture, and a simple paint job (an accent wall in a calming blue or green costs about $30 in paint and transforms the room). A practical layout puts the desk facing or perpendicular to the window, storage along one wall, and a small reading chair or floor cushion in a corner for a change of posture. This is also a good room for a full aesthetic home office makeover if you want to make the space feel truly yours.
Garage or Basement Office
These spaces give you room and privacy, but they come with specific problems. Lighting is usually the biggest issue—basements and garages tend to have harsh overhead fluorescents or no light at all. Swap fluorescent tubes for warm-tone LED tubes (same fixture, just different bulbs, about $15–$20) and add a floor lamp and desk lamp to create layers. Temperature can be managed with a space heater in winter ($25–$50) and a fan in summer. For flooring, a large area rug ($30–$60) or interlocking foam floor tiles ($20–$30 for a desk area) will make a concrete floor feel warmer and less industrial. If dampness is an issue, run a small dehumidifier and avoid storing paper files directly on the floor. With $100–$150 in targeted improvements, a garage or basement can become a perfectly functional workspace.
Lighting Your Home Office on a Budget
Good lighting is one of the highest-impact, lowest-cost upgrades you can make. Bad lighting causes eye strain, headaches, and makes you look terrible on video calls. Good lighting keeps you alert, reduces fatigue, and makes your whole office look better.
Start with natural light. Position your desk beside or facing a window rather than directly in front of it with your back to the room—this gives you the benefit of daylight without creating a backlit silhouette on video calls. If your window gets harsh direct sun, a sheer curtain ($10–$15) diffuses the light beautifully and costs almost nothing.
Beyond natural light, you want two types of artificial light: ambient light (general room brightness) and task light (focused illumination on your work surface). For ambient light, a simple floor lamp with a warm-tone LED bulb ($20–$40 total) fills a room much more pleasantly than a bare overhead fixture. For a task light, a basic adjustable desk lamp in the $15–$30 range is all you need—look for one with an adjustable arm so you can direct the light exactly where you need it. One of the most effective budget lighting tricks is simply swapping the bulbs in existing fixtures for warm-white LED bulbs (2700K–3000K, around $3–$5 each), which instantly makes a room feel more inviting without buying new fixtures at all.
As for ring lights, they’re useful if you spend a lot of your day on video calls and your room has poor natural light. A basic 10-inch ring light runs $15–$25 and does make a noticeable difference. But if you already have a window to one side and a decent desk lamp, you can get very similar on-camera results for free—sit with the window light falling on your face from the side and position the desk lamp in front of you, slightly above eye level. Test it on a call before buying anything extra.

Ergonomics on a Budget
Ergonomics isn’t a luxury—it’s what keeps your back, neck, wrists, and eyes from punishing you for sitting at a desk eight hours a day. And most ergonomic improvements cost little or nothing. Don’t ignore your body just because you’re on a budget; these adjustments are some of the most important things in this entire guide.
Your monitor or laptop screen should be at eye level so you’re not looking down all day, which strains your neck. If you use a laptop, the cheapest fix is a stack of books or a sturdy box to raise the screen, paired with an external keyboard ($15–$20). You can also build a simple monitor riser from a piece of wood and four short legs or blocks for under $10. According to the Mayo Clinic’s office ergonomics guidelines, the top of your screen should be at or slightly below eye level, about an arm’s length away from your face.
For lumbar support, you don’t need a $400 ergonomic chair. A firmly rolled bath towel secured with rubber bands and placed in the curve of your lower back works remarkably well—it’s free, and you can adjust the thickness. A small throw pillow does the same. If you’d rather buy something, basic lumbar cushions are available for $15–$25 and strap onto any chair.
A footrest helps if your chair is too high and your feet don’t rest flat on the floor. A sturdy shoebox, a yoga block ($8–$10), or a small step stool ($10–$15) all work. The goal is to have your thighs roughly parallel to the floor with your feet supported.
For keyboard and mouse positioning, your forearms should be approximately parallel to the floor with your wrists in a neutral, straight position—not bent upward or downward. If your desk is too high, a keyboard tray ($20–$35, clamps under the desk) brings your hands to the right height.
Finally, follow the 20-20-20 rule for eye strain: every 20 minutes, look at something 20 feet away for 20 seconds. Set a quiet timer if you need the reminder. It costs nothing and makes a real difference over a full workday.
Decor & Personalisation Without Overspending
A workspace that feels like yours is a workspace you’ll actually want to sit down in every morning. The good news is that personality and polish don’t require a big spend—they mostly require intention.
If you own your home, paint is the single highest-ROI upgrade you can make. A gallon of paint costs $25–$40, and a single accent wall behind your desk completely changes the feel of the room. Soft blues and greens promote focus and calm, warm neutrals (greige, warm white, soft taupe) feel grounded and polished, and a muted sage or dusty rose adds personality without being distracting. Avoid painting all four walls a very saturated or bright color—it can feel overwhelming during an eight-hour workday.
If you’re renting, peel-and-stick wallpaper or wall decals ($20–$40 per roll) give you the same impact without any commitment. Apply it to a single wall or even just a panel behind your desk. It peels off cleanly when you move. For more renter-friendly wall treatments and art ideas, explore our wall decor ideas guide.
Art doesn’t have to cost anything. Free printable art is widely available online—botanical prints, abstract designs, typography, vintage illustrations. Print them at home or at a copy shop for a few dollars and frame them in thrifted frames ($2–$5 each at secondhand stores). A set of three matching frames with coordinated prints instantly makes a wall look curated.
DIY bulletin boards, cork boards, and pegboards serve double duty as decor and function. A framed piece of cork ($10–$15) gives you a pinboard for notes, inspiration images, and reminders. A painted pegboard ($15–$25 for board plus paint) holds supplies, plants, and accessories while adding texture to your wall.
Plants boost both mood and air quality, and the lowest-maintenance options are also the cheapest. Pothos, snake plants, and spider plants are nearly indestructible, tolerate low light, and cost $5–$15 at most garden centers or grocery stores. A small plant on the desk and a trailing one on a shelf add life to any office without adding effort.
As a general rule for color in your workspace, start with a neutral base and add one accent color for energy. This keeps the space visually calm while still feeling personal—and it’s much easier to execute on a budget than a complex multi-color scheme.

Tech Setup for Remote Workers on a Budget
You don’t need expensive gear to look and sound professional on calls or to work efficiently from home. A few intentional adjustments with things you probably already have will get you 80% of the way there.
Video call setup: Camera angle matters more than camera quality. Most laptop cameras are fine—the problem is that they’re too low, shooting up at your chin, when the laptop sits on a desk. Raise your laptop on a stack of books or a box so the camera is at eye level. For your background, you don’t need a dedicated backdrop: a clean wall, a bookshelf with a few items, or even a simple piece of art behind you looks professional. Place a warm lamp in front of you and slightly to one side (not behind you), so your face is evenly lit. These three changes—camera height, clean background, front-facing light—make a bigger difference than any webcam upgrade.
Noise and sound: Hard floors and bare walls create an echo that makes you sound like you’re in a bathroom on calls. Soft furnishings absorb sound: a rug on the floor, curtains on the window, even a bookshelf full of books acts as a sound dampener. If your environment is noisy, a decent pair of headphones with a built-in microphone ($20–$40) will dramatically improve how you sound to others. You don’t need a studio microphone for regular meetings.
Internet and positioning: If your Wi-Fi is unreliable at your desk location, the simplest fix is a long Ethernet cable ($10–$15 for 25 feet) run from your router to your desk. It’s not elegant, but it’s rock-solid. If that’s not possible, try to position your desk as close to the router as your layout allows, or at least minimize the number of walls between you and the router. A Wi-Fi extender ($15–$30) can help in larger spaces. These are practical, immediate solutions that don’t require any networking expertise.
Tiered Budget Breakdowns
Here are three sample shopping lists to show what’s realistic at each price point. These aren’t rigid prescriptions—swap items based on what you already own and what your space needs most. Use them as a starting framework and adjust.
$100 Home Office Refresh
This tier assumes you already have a desk and chair (even if it’s a dining table and a kitchen chair) and focuses on making your current setup more comfortable, functional, and pleasant to sit in all day.
- Adjustable desk lamp + warm LED bulb: ~$20. Instantly better lighting for work and calls.
- Small plant (pothos or snake plant): ~$8. Life and color on the desk.
- Area rug or desk mat: ~$20–$25. Defines the workspace zone and adds warmth underfoot.
- Cable management kit (adhesive clips + cable sleeve + velcro strips): ~$15. Tames the cord chaos.
- Two framed prints (free printables + thrifted frames): ~$10. Personality on the wall.
- Lumbar pillow or rolled towel + monitor riser (books or a DIY wood riser): ~$10–$15. Basic ergonomic improvements that your back will notice immediately.
Approximate total: $83–$93. You’ll have enough left over for a small corkboard or a second plant.
$300 Home Office Setup
This tier is for building a functional workspace close to from scratch—a real desk, reasonable comfort, and a space that looks intentional.
- DIY desk (file cabinets + board, or trestle legs + countertop): ~$60–$100. A solid, real work surface.
- Basic task chair or significant chair upgrade (good cushion + lumbar support): ~$60–$80. Look for a secondhand task chair in good condition, or pair a cheaper chair with a quality seat cushion ($25) and lumbar pillow ($20).
- Floating shelves or a small bookcase for storage: ~$30–$50. Vertical storage keeps the desk clear.
- Desk lamp + floor lamp: ~$35–$45. Layered lighting for comfort and calls.
- Cable management kit: ~$15.
- Decor (prints, plant, small rug or mat): ~$30–$40.
Approximate total: $230–$330. This gives you a workspace that genuinely supports a full workday.
$500 Home Office Makeover
At this tier, you’re building a complete, comfortable, good-looking, affordable home office that you can be proud of. The biggest difference between $300 and $500 is comfort and aesthetics—a better chair, more polished decor, and some finishing touches that make the space feel intentional rather than improvised.
- IKEA countertop + ALEX drawer desk hack: ~$150–$200. A large, sturdy, great-looking workspace.
- Task chair (new budget ergonomic or quality secondhand): ~$100–$130. At this tier, prioritize an actual ergonomic task chair with adjustable height and lumbar support.
- Lighting (desk lamp + floor lamp + LED bulb swaps): ~$45–$55.
- Storage (floating shelves + pegboard or bookcase + baskets): ~$50–$60.
- Rug (4×6 area rug): ~$35–$50.
- Decor (accent wall paint or peel-and-stick wallpaper, framed art, plants, desk accessories): ~$50–$70.
- Cable management + tech (cable kit + headset or external keyboard): ~$30–$45.
Approximate total: $460–$510. At this level, you have a home office makeover on a budget that looks and feels like a much more expensive room. The biggest upgrade at this tier is the chair—spending $100+ here pays for itself in fewer backaches and more productive days. All of these DIY home office ideas on a budget are meant to be mixed and matched so you can build a setup that fits your space, work style, and bank account.

FAQ – DIY Home Office Ideas on a Budget
How can I create a home office on a very small budget?
Start with what you have. A dining table, a cleared-off dresser, or even a sturdy board on two stacks of books can serve as a temporary desk. Focus your first dollars on the things that affect your comfort and productivity most: a good light source (a $15 desk lamp), basic cable management ($5–$10 in clips), and something to raise your screen to eye level (free if you use books). Add a plant and a single piece of art to make it feel like a space you chose, not a space you’re stuck in. You can build a genuinely functional home office for under $50 if you prioritize wisely.
What is the cheapest way to make a home office desk?
The cheapest method is a secondhand file cabinet (or two) with a board, old door, or countertop remnant laid across the top. You can often find file cabinets for $10–$20 at thrift stores, and a pre-cut shelving board from a hardware store runs about $10–$20. Total cost: roughly $20–$40 for a sturdy desk with built-in storage. If you don’t even want to spend that, a wall-mounted fold-down shelf on two brackets costs about $15–$20 in materials and folds flat against the wall when not in use.
How do I set up a home office in a bedroom corner?
Choose the corner farthest from your bed if possible, and visually separate it from the sleeping area. A small area rug under the desk defines the zone. A curtain on a tension rod, a narrow bookshelf turned sideways, or even a tall plant can act as a visual divider. Keep the desk compact (40 inches wide or less) so it doesn’t dominate the room. Use a dedicated desk lamp that you only turn on during work hours—this light-based boundary helps your brain switch between work mode and rest mode. At the end of the day, close the laptop and tidy the surface so the workspace “disappears” as much as possible.
How can I convert a closet into a home office cheaply?
Remove the closet doors or replace them with a curtain on a tension rod. Measure the interior width and install a shelf or cut a board to fit as a desk at your elbow height—the side walls of the closet support the surface, so in many cases you only need small brackets or even just L-brackets. Add a shelf or two above for storage using the same approach. For lighting, stick a plug-in LED puck light or adhesive LED strip under the top shelf and run a slim extension cord to the nearest outlet. The whole project can cost under $50 and gives you a surprisingly private, focused workspace that you can close off at the end of the day.
What should I prioritise if I only have $100 to spend?
Lighting and ergonomics first, decor second. A $15–$20 desk lamp with a warm LED bulb reduces eye strain and makes calls look better. A DIY monitor riser (free with books, or $10 in wood) and a rolled towel for lumbar support protect your body during long work days. Spend another $15 on cable management to make the space feel orderly. With the remaining $50 or so, add a small rug, a plant, and a piece of art. These targeted purchases make a bigger practical difference than buying a new desk or chair at this budget level—save those for when you can spend $300 or more.
How can I make my home office comfortable without buying an expensive ergonomic chair?
You can significantly improve almost any chair for under $40. Add a firm seat cushion ($15–$25) if the chair is too hard or too flat—look for memory foam options. For lumbar support, a small pillow, a rolled towel, or a dedicated lumbar cushion ($15–$20) placed in the curve of your lower back makes a dramatic difference. Make sure your feet are flat on the floor or on a footrest (a shoebox or yoga block works). If the chair doesn’t adjust in height, adjust the desk instead—a keyboard tray that clamps under the desk ($20–$30) brings your hands to the right level. According to OSHA’s computer workstation guidelines, proper positioning matters more than the specific chair you’re using.
What are some renter-friendly home office ideas on a budget?
Focus on solutions that don’t require drilling, painting, or permanent modification. Use command strips and adhesive hooks for hanging art, headphones, and lightweight shelves. Freestanding bookcases and cube organizers provide storage without wall anchors. A tension rod holds a curtain for room division or closet conversion without any holes. Peel-and-stick wallpaper or removable decals add color and pattern to walls that you can peel off cleanly when you move. For desks, a countertop resting on drawer units or trestle legs requires zero wall attachment. For home office ideas specifically, the rule of thumb is: if it can’t come with you when you move, don’t buy it.
How do I make a small home office look bigger?
Light colors on walls and furniture make a space feel more open—stick with whites, light grays, or soft pastels. A mirror on the wall opposite a window reflects natural light and visually doubles the depth of the room. Keep surfaces clear and use vertical storage (floating shelves, wall-mounted organizers) to free up floor space. A single larger rug actually makes a small room feel bigger than several small ones. Avoid visual clutter by keeping your color palette to two or three colors, and choose furniture with slim profiles and visible legs, which lets the eye see more floor and creates an illusion of openness.
Can I build a complete home office for under $200?
Absolutely. A DIY desk from thrifted file cabinets and a board costs $30–$60. A secondhand task chair in good condition can be found for $30–$50 on Facebook Marketplace if you’re patient. A desk lamp runs $15–$20, cable management about $15, and you can round out the space with a small rug ($15–$20), a plant ($5–$10), and a couple of framed prints ($10). That puts you at roughly $120–$185 for a full, functional, and attractive workspace. The key is thrifting the big pieces (desk, chair, any shelving) and buying only small items new.
What’s the best way to deal with a home office that’s also a shared space?
When your office doubles as a dining room, living room, or bedroom, the priority is being able to set up and pack up quickly, or at least visually close off the work area. A fold-down wall desk or a laptop on a tray table that slides away are the most practical desk solutions. Keep all your work supplies in a single portable caddy, basket, or drawer so you can clear the surface in 30 seconds. If the desk stays in place, use a decorative cover or tray to transform it after hours. Visual dividers—curtains, screens, tall plants—help signal to your brain and your household that the area changes purpose throughout the day.